Microquad
August 2015
Inhaltsverzeichnis
- Microquad
- PID Dump

Motoren und die Elektronik werden mit der Zeit immer kleiner. Gerade das Miniquad Fliegen und Racen ist mit kleineren Coptern nochmal etwas spannender.
Aus dem Grund beschloss ich meinen zweiten Miniquad mit 3" Propellern und so klein wie nur möglich zu designen.
Zuerst ging es an die Auswahl der Bauteile:
- Afromini rev3
- DYS SN16A
- Sunnysky x2204s
- Pololu 5V Step-Down D24V5F5
- Sunnysky x1306s CW (CW = Rechtsgewinde)
- Frsky D4R-II
- Turnigy nano-tech 850mAh 4S 45C
- 600TVL 120degree Wide Angle Super Mini FPV Camera with MIC
Angefangen hab ich damit, das Frame grob zu zeichnen und die Teile zu platzieren.

Mit einer Idee im Kopf ging es ans Inventor. Statt einer üblichen Topplate versuche ich mich hier an einem Alukäfig zum Schutz der Eingeweide.
Es ist immer gut einen Prototyp in der Hand zu haben, bevor es entgültig an den Bau geht.
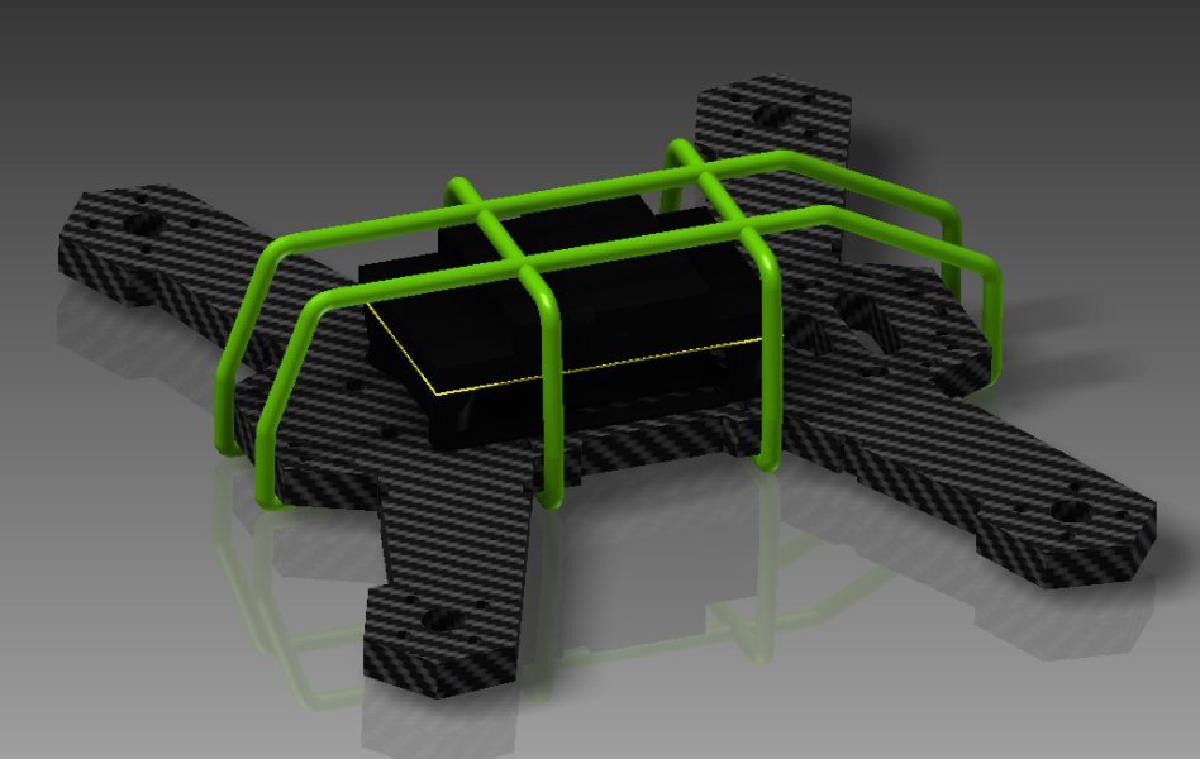

Da das Frame aus einem Teil besteht sollte dieses aus stabilem Material sein. Statt 5mm dickes Carbon zu nehmen entschied ich mich aus Gewichts, Kosten und nicht zuletzt optischen Gründen für ein Carbon - PVC Schaum Sandwitch. Die obere und untere CFK Platte ist jeweils 0,7mm dick, die PVC Schaumplatte bringt mit 3mm die Gesamtdicke auf knapp 4,5mm. Geklebt wurde mit WEICON RK-1500. Vielen Dank an dieser Stelle an Pascal für den Kleber, sowie das Fräsen.


Ein paar Schlitze für Kabelbinder sind nur 1,2mm breit und musste daher zuerst mit einem <= 1.2mm Fräser gefräst werden. Die Kreise unter den Motorachsen sind als Taschen gefräst. Dadurch geht der Sprengring beim eventuellen abfallen nicht komplett verloren, was mir bei meinem Miniquad schonmal den Flugtag gerettet hat.
Die DXF Dateien sind übringens am Ende der Seite zu finden.


Was schwer anhand von Fotos zu erkennen ist, das Teil ist wirklich sehr klein. Selbst der SMA Stecker am Videosender währe zu groß gewesen und würde mit aufgeschraubter Antenne weit aus dem Frame herausragen. Daher hab ich ihn mit einem für diesen Zweck besser geeigneten U.FL Stecker getauscht. Auch eine normalerweise zu präferierende Cloverleaf Antenne ist breiter als das ganze Frame und wird so vermutlich nicht viele Crashs mitmachen. Also, ganz oldschool nen Dipol an nen U.FL Pigtail gelötet.
Viertel Wellenlänge = 1/4 * c/f = 299 792 458/5866000/4 = 12,78mm.


Als nächstes das Umflashen der DYS SN16A ESC’s, welche etwas günstiger als die BL16A waren. Ich hab kein Problem damit den BLHeli bootloader selber per ISP zu flashen, von daher waren es mir die paar ct wert.
Padbelegung von Links nach Rechts: MOSI, MISO, SCK, GND, 5V, RST
Jedes ESC hab ich in der BLHeli Suite von 1 bis 4 durchnummeriert und entsprechende Nummer durch Anzahl an markierten Kondensatoren am ESC gekennzeichnet.


Wie gesagt ist auf dem Frame so gut wie kein Platz. Der Empfänger, ein nackter FrSky D4R-II, wird in einem 3D gedruckten “Tisch” von unten eingelassen. Durch puren Skill meinerseits passten die Signal, 5V und GND pins direkt aufeinander und konnten durch das Plastik direkt zusammengelötet werden. Wieder 0,5g gespart, jeijj.
5V, GND, TX und RX sind gerade nach hinten herausgefürt um dort später zum Programmieren angeschlossen zu werden.


Mit etwas Moosgummi als Abstandshalter und Doppelseitigem Klebeband rutscht die Flight Control nicht weg. Oben drüber kam später noch ein gedruckter Deckel. Das ganze Packet wird dann mit einem Kabelbinder zusammengehalten.


Aus der CNC kam dann dieses Formschöne PDB. An den beiden Großen Flächen werden die Akkukabel, sowie alle vier ESC’s angelötet. Die vier Löcher dienen der befestigung des Pololu 5V Stepdown, sodass an den kleineren Lötflächen dann GND und 5V für FC und Empfänger abgegriffen werden können.
Der ganze Copter soll möglichst ein Grün Schwarzes aussehen bekommen, daher musste die Platine schwarz lackiert werden.


Die Kamera ist passend zum Copter ebenso unglaublich klein und hat leider keine wirklich gute Möglichkeit zur Befestigung. Am einfachsten erschien es mir daher, die in einem gefrästen Aluwinkel mit etwas Heißkleber einzukleben.


Nun konnten alle Kabel am PDB verlötet werden. Um der Farbgebung treu zu bleiben verwende ich grünes (mit einem Hang zum Türkisen) Silikonkabel (16AWG).
Die Signalkabel der ESC’s (weiß durch schwarz ersetzt) sind am Ende mit Schrumpfschlauchringen gekennzeichnet.


Mit M2 Schrauben wird der Plastikhalter von unten mit dem Frame verschraubt.
Außer den Motoren und dem Plastik in der Mitte ist sonst nichts verschraubt. Nur mit Grünen und Schwarzen kabelbindern festgezogen.


Nach dem die vier Stangen 2,4mm Aluminium schweißzusatz zurechtgebogen waren wurden diese mit Kabelbinder durch die vorhandenen Schlitze im Frame befestigt.
Zwei Klettbänder halten dann später den Akku unterm Copter fest. Die Nano-tech 4S 850mAh sind doch etwas unförmiger als ich annahm.


Fürs erste verwende ich auf 3" runtergefräste Gemfan 5045 Propeller. Mit 4S fließen so 23,5A bei Vollgas und etwa 7A bei Halbgas.
Die Schwarzen M4 Aluminiumhütchen der Sunnysky Motoren hab ich durch M4 Selbstsichernde Flanschmuttern ersetzt.

Flugzeit liegt damit bei gut 7 Minuten. Bald werde ich hoffentlich die Aluminiumteile grün Eloxieren können.
Leider musste ich hier auf einen Discovery Buzzer verzichten und einen seperaten Lipowarner mit anbringen, da aus unerfindlichen Gründen der Buzzer des Afromini nicht funktionieren will. (Damit bin ich anscheinend nicht der einzige: froMini 32 fc, discussion and setup)


Leider hat es hier (Herbstanfang 2015) vorher etwas Geregnet, sodass das gemähte Gras nach den Erstflügen gut klebte.

Maiden Flight
Files
DXF und STL Dateien: Version 20150926