Hoverboard Firmware Hack - How to
December 2017
Related Pages
- E-Bobby Car
- Hoverboard Firmware Hack - How to
- Anhänger (DE)
- Controller
- Controller (Teensy)
Compiling and flashing the hacked firmware for the hoverboard-circuitboards isn’t obvious. So for me to remember what I have been doing and also maybe for those who want to try this too I wrote this short instruction which will describe what I did and what worked for me. Not saying its the only or even right way.
Also I’m not the creator of this hacked firmware and therefore I am not able to help with in-depth problems. Please also keep in mind that there is a probability that your board can be destroyed.
The current version of the Firmware can be found here: github.com/NiklasFauth/hoverboard-firmware-hack
Since Dezember 2019 I am using a fork by Emanuel Feru which supports FOC (Field Oriented Control): github.com/EmanuelFeru/hoverboard-firmware-hack-FOC
I’m assuming your using Linux, more specifically some kind of Ubuntu based Linux.
The programmer I am going to be using is a cheap ST-Link V2.
Compiling the firmware
In order to compile, gcc-arm is needed.
Your can get get it either by downloading the files yourself ( developer.arm.com/tools-and-software/open-source-software/developer-tools/gnu-toolchain/gnu-rm/downloads ) and extracting the directory “gcc-arm-none-eabi-…” or the easy way:
sudo apt-get install gcc-arm-none-eabi
Edit: There could be problems with some versions. gcc-arm-none-eabi-7-2018-q2-update did the job for me.
After that you need to clone the firmware from Github:
git clone https://github.com/NiklasFauth/hoverboard-firmware-hack.git
or
git clone https://github.com/EmanuelFeru/hoverboard-firmware-hack-FOC.git
Then change to that directory and compile.
Most likely you’ll have to give the path to the downloaded gcc-arm toolchain in the “PREFIX” variable. I unpacked the directory from inside the gcc-arm-none-eabi-7-2018-q2-update-linux.tar.bz2 file to my home directory. The corresponding line in the makefile then looks like this:
PREFIX = ~/gcc-arm-none-eabi-7-2018-q2-update/bin/arm-none-eabi-
When thats done execute:
cd hoverboard-firmware-hack

make
If the file build/hover.bin exists compiling worked without problems.
Now you should make your own adjustments to the settings. This is mainly done by (un-)commenting things like control method in the Inc/config.h.
For example commenting out #define CONTROL_NUNCUCK: //#define CONTROL_NUNCUCK
and uncommenting the desired method like control speed and direction via potentiometer or a hallsensor: #define CONTROL_ADC
(Sometimes the endpoints have to be calculated and entered in the src/main.c file. Just search for #ifdef CONTROL_ADC.
Save and compile again:
make clean
make
STM32 Toolchain
sudo apt-get install openocd libusb-1.0-0-dev cmake build-essential
git clone https://github.com/texane/stlink
cd stlink

make release
mkdir build
cd build
cmake -DCMAKE_BUILD_TYPE=Debug ..
make
cd Release
sudo make install
sudo ldconfig
Connecting the hoverboard:
- Connect the cables from the motor to the controller first by mathing the colors. If the motor does not spin smooth (which is likely) try swithing the colors around. Theres only one working combination.
- Connect the hallsensor. The long wires belong to the motor with the long motor wires.
- Connect the power button.
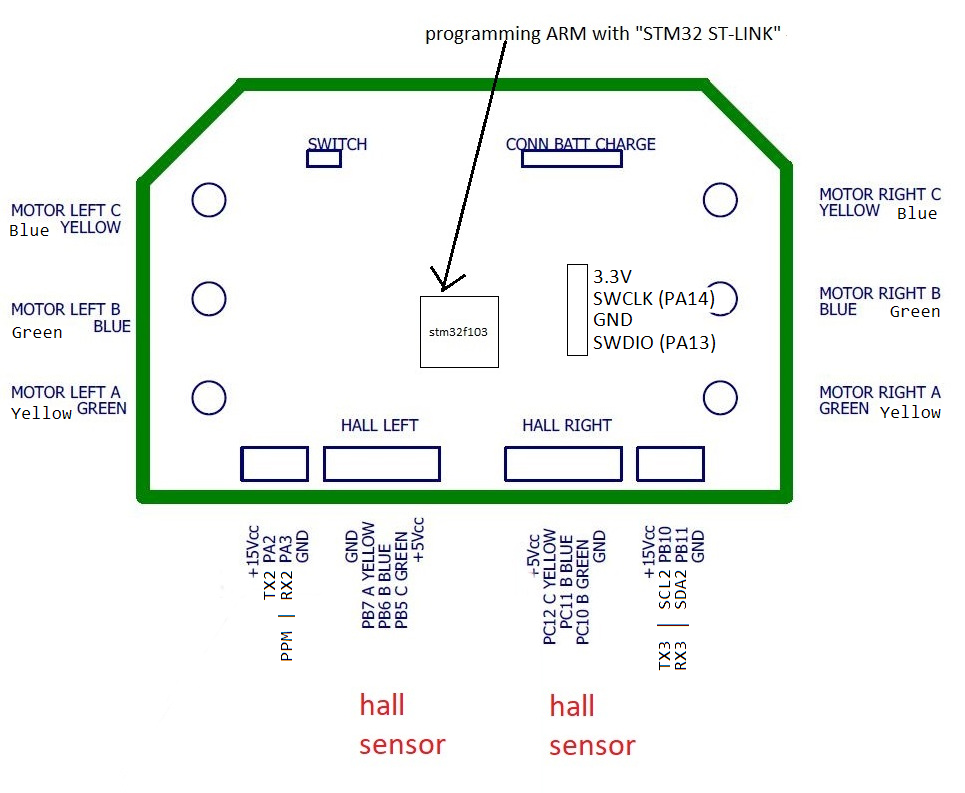
- Connect a poti or your pwm signal to the green wire from the remaining long unused 4 pin connector “RX2 / PA3”. Dont forget GND. 3.3V Signal Level!
- Connect
swclock,GNDandswdiofrom the Programmingheader to the ST-Link (not 3.3V !). It is recommended to solder in a pin strip. Pinout: raw.githubusercontent.com/NiklasFauth/Hoverboard-Board-Hack/master/pinout.png - Plug the ST-Link V2 into your USB port.
- Plug in a 10S Lipo/LiIon Battery or even better a powersupply with 40V and overcurrent protection.
- Push the power button and keep it held down during flashing!
- Test if the STM is recognized:
st-info --probe
- If the chipid isn’t 0x0000 the stm got recognized.
- Release the button.
Unlocking the STM
On a fresh board the STM is locked an has to be unlocked in order to be able to write to it.
- Press and hold the power button!
openocd -f interface/stlink-v2.cfg -f target/stm32f1x.cfg -c init -c "stm32f1x unlock 0"
- Or if this doesn’t work “Error: Target not halted”:
openocd -f interface/stlink-v2.cfg -f target/stm32f1x.cfg -c init -c "reset halt" -c "mww 0x40022004 0x45670123" -c "mww 0x40022004 0xCDEF89AB" -c "mww 0x40022008 0x45670123" -c "mww 0x40022008 0xCDEF89AB" -c "mww 0x40022010 0x220" -c "mww 0x40022010 0x260" -c "sleep 100" -c "mww 0x40022010 0x230" -c "mwh 0x1ffff800 0x5AA5" -c "sleep 1000" -c "mww 0x40022010 0x2220" -c "sleep 100" -c "mdw 0x40022010" -c "mdw 0x4002201c" -c "mdw 0x1ffff800" -c shutdown
This is one line!
- Release the power button.
Flashing the firmware
- Press and hold the power button during flashing!
st-flash write build/hover.bin 0x08000000
- Release when finished.
Testing
The board can now be powered up by pressing the power button. -> Funny beeping sounds.
Try increasing the throttle slowly. You can do this with only one motor connected.
I would recommend to use a bench power supply set to 40V and a current limit of 0.5A. If you’re using a power supply decrease the throttle slowly, currents from recuperation can kill your powersupply.
If the motor doesn’t turn even if a significant amount of current flows or the motor stutters you should first test all possible motor-controller wire configurations.
Good luck!